Chromatic Aberrator Script

Chromatic Aberration After effects ScriptPro Users can download the Chromatic Aberrator Script Here

Chromatic Aberration is a fantastic way to add style and energy to your shots. It’s wonderful for glitches, music videos, space-travel and logo animations. The techniques, while fairly simple, are always time-consuming. We took our 5 Favorite Chromatic Aberration techniques and turned them into an Adobe After Effects Script!

This Script is exclusive for our Pro Users.

Install the Chromatic Aberrator Script in your After Effects > Scripts folder.

To launch, open AE and go to File > Scripts > Chromatic Aberrator

Select the layer you want to apply the Chromatic Abberator to in your composition.

Choose one of the 5 aberration effects. For further customization there are options to adjust the amount of blur, speed, complexity, and even flip the RGB values!

Note: If you want to apply the Chromatic Aberrator to all layers in your composition, just precompose them all together and then apply the script to that precomp. Alternatively, just select all the layers and add the Chromatic Aberrator method you want to use.

The Effects and Controls Null allows you to adjust your Chromatic Aberrator Settings after you have created the effect.

Each effect has different adjustments to further customize your animations. Here, you can also use keyframes if you would like to animate the effect.

This is particularly useful for the glitch and turbulent effects, but can come in handy for any of them. Play with it, and come up with your own custom creations.

After you have your Chromatic Aberration effect looking the way you want, jump back in to your main composition to see how everything looks. You can always go back and make adjustments later.

Check out our 5 Different Techniques you can easily make in the examples below!

See all our Scripts & Plugins Here!

Glitch Effect

Chromatic Aberration Glitch

Lens Effect

Optics Compensation EffectLens Effect

Transform Effect

Transform Effect

Pro Script for Chromatic Aberration

Mystique Transformation Effect

Using After Effects and C4DLite Chris and Adrian teach you how to create this iconic effect from X-Men, the Mystique Transformation!

Find the Feather Transition Rendered FX Here

Pro Users can download the  3D Head C4Dlite and Alembic Files (PRO)

Find Eugene’s Tutorial Here

Enjoy the Saturday Morning Tutorials? Check out the The Complete Episode Guide

Birds and Bees VFX

We have some new effects for you, Birds and Bees!

This isn’t a euphemism, we literally created some bird and bee effects for our latest Animals & Creatures category.

A common issue with matte painting and compositing is that everything just looks too static. Reality isn’t static. These new effects help add some life to your digital-masterpieces. Whether you’re making a skin-crawling horror film or a matte-painted period piece, these new assets will come in handy.

We will be adding to this category regularly, with some upcoming 3d builds and some live-action footage!

Predator Effects! (Heat Vision & Cloaking)

Predator effects are awesome. The Predator cloaking and thermal-vision VFX have been used since the original premiered in 1987, and we decided to finally tackle these iconic FX ourselves. Check out our #SaturdayMorningTutorial below to learn how to make these FX yourself in Adobe After Effects!

You can find our HUD Video Assets Here

And the HUD AE Template Here

Enjoyed the tutorial? Check out our #SaturdayMorningTutorials episode guide

Interview with Matt Dean – SyFy Original: Megalodon!

The SyFy Channel has a long history producing VFX heavy Shark Week films, and 2018 was no exception. One of those films released was the SyFy original Megalodon (not to be confused with The Meg (2018))

We had the pleasure to talk with Matt Dean, a VFX artist who knows a thing or two about the industry, and how you can succeed yourself! Let’s dive in.

Hey Matt, can you tell us a little about who you are and the work you do?

I am a producer and filmmaker with 25 years of experience in film, television and education. I own Matt Dean Films Inc – a Production and Distribution Company that works on everything from documentary series like “Creators of Tomorrow” for Redbull TV, to feature films like “Two Jacks” with Sienna Miller and Danny Huston and made for TV movies for Syfy Channel like “Megalodon” with Michael Madsen.

What software do you use most often?

We use a wide range of software, some in house and others with our freelancers who are based around the world. Maya, Cinema 4D, Lightwave, After Effects, Houdini, Premiere, Nuke, DaVinci, and we are just starting to get into Fusion.

“Megalodon” recently premiered on the SyFy Channel, was that the first SyFy original you worked on?

Megalodon was our first project working with “The Asylum” for Syfy Channel. The Asylum then asked us to help with some of the remaining Effects on “6-headed Shark” which also aired that week. Prior to that, we’ve worked on shows for the History Channel, Discovery Channel and a number of feature films.

VFX Breakdown from Matt Dean Films on Vimeo.

Which ProductionCrate effects did you use in “Megalodon” ?

We used a Glass shatter, a few dirt and debris FX, Smoke Plume, smokey Atmosphere, Top view dust burst – and possibly a few others.

You’ve been in the industry for a long time, what are some of the biggest changes you’ve seen?

One of the biggest changes I’ve seen is in the quality of VFX required for a decreasing budget. We just don’t have time or budget to build everything from scratch anymore which is where it helps to have sites like footageCrate.com

A lot of ProductionCrate members are looking to get started in filmmaking and VFX, any suggestions on where to begin?

As to getting into filmmaking, That’s a REALLY big question. Do you want to be a professional producer, director DP, actor, VFX artist? Each has a very different path in filmmaking. For people wanting to make their own films – First, they should get the book “Success in Film” by world-renowned producer Julia Verdin and myself. (yes, it’s a shameful plug but it really is a good book) – Success in Film is a guidebook for figuring out WHY you want to make a film before you learn the HOW you make a film. EVERYBODY wants to make a movie and frankly, anyone can with just a cellphone. Achieving success in filmmaking is however much, much harder. In the book, we laid out the basics that anyone can follow on any scale of film, large budget or small, while keeping a balanced approach to what they expect to get out of the film.

Second,

you have to have a long-term plan if you’re going to make it in the film industry.

It can take several years to build up the connections and a team of people to create success for yourself. Whatever career you want to take on (Matte Painter, Make-up artist, set construction, prop master, etc…) it can take years of experience to get to a place where you’re making a living from the industry. There are thousands of people every year who try to make it in the film industry only to give up and return home a short time later. Find one area to focus on, read everything you can on it, and work for free if you have to until you can build up your resume and have a great demo reel.

Getting into professional VFX work is not very difficult if you are willing to put in the hours it takes to learn the techniques.

Every piece of VFX software that is used by the pros is accessible to the masses along with hundreds of hours of tutorials. Your software and career choices are numerous so it’s good to focus on a single technique and software that will get you hired rather than just fooling around with the free ones. If you want to try 3D modelling and design, start with software like Maya or Cinema 4D. Want to try water, hair and cloth FX? – Houdini is the gold standard. For compositing, you can start with software like Fusion (which is Free) and After Effects ($20+ per month), but the main one used by the big studios is Nuke which is a lot more expensive at $5-10k. (There are however 30-day free trial versions of Nuke) Compositors, rotoscope artists and 3D modelers are in high demand with all of the big budget VFX films being made by the studios. There’s no excuse for not learning one of these arts with so much available at your fingertips.

Thanks for sharing the demo video, do you have any other projects in the pipeline you could tell us about?

We just added a distribution branch to the company so we are focusing on finding new films to add to our line up as well as prepare for The American Film Market (AFM) this November. We just released two Documentaries “Leaving My Father’s Faith” and “The Old Man and the Sea: Return to Cuba”. We are also developing a TV series based on our award-winning short film “Dicky Sledgehammer” which we hope to have in production in the first quarter of next year.

People can keep up with what we are doing on our main website – mattdeanfilms.com


Using our Puddle Maps!

If you’re reading this, there’s a chance you’ve stumbled upon our puddle map collection and wondered, “What on Earth are these for?”. You’re not alone!

If you’ve had some experience with 3D design, you may be familiar with “glossy maps” or “reflection maps”. These are textures which can tell rendering software how “shiny” an object is. Think of a white texture being for a mirror (very shiny), and a dark gray texture used for concrete (very dull and matted). We discovered we can use these in After Effects to create utterly-realistic reflections to help composite VFX into your scene, or just make it visually incredible. You may have seen Andrew Kramer’s Video Copilot tutorial which involved a similar process.

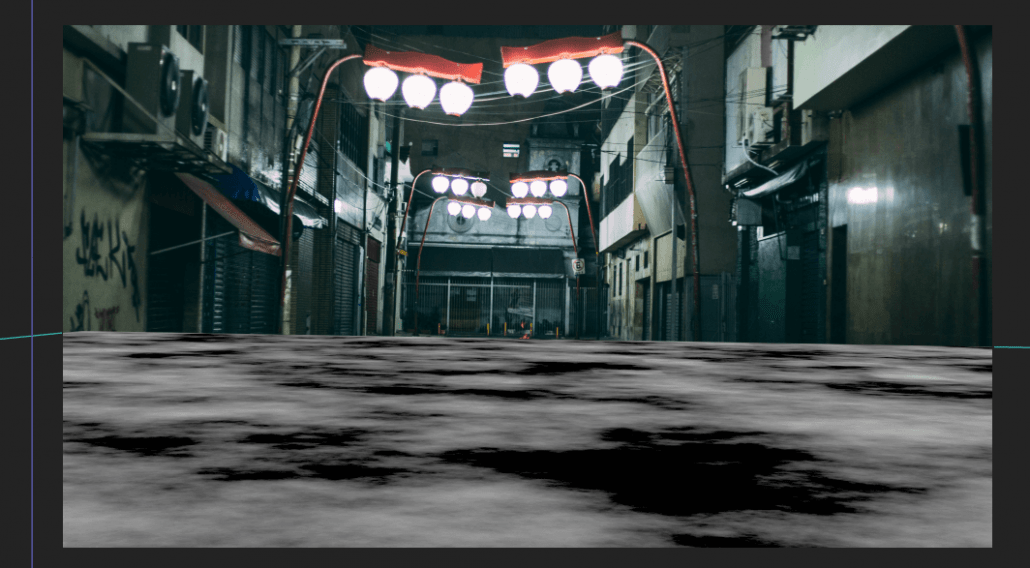
We have dropped one of our fire VFX assets (found here) into our street, but anyone can see it is looking pretty dull at the moment! Our mission is to make this look both realistic and more visually interesting!

Puddle Tutorial Part 1

We will then need one of our puddle maps. There are different varieties (such as asphalt, tiles, road surfaces and more), so choose which one best fits your shot. Drop it into your scene, make it 3D, and align it with your ground:

Puddle Tutorial Part 2

Here is where you might see where this is going! Duplicate any of the layers you want to reflect in the puddle. In this case, the fire and the backdrop. We’ll name them the same but with “Reflection” at the end. Pre-compose the puddle map as well.

Puddle Tutorial Part 3

For each of the “Reflection” layers, flip it vertically and position it in a place where it would approximately match what it would look like if the floor was a gigantic mirror. Here’s my attempt (with the walls roughly masked out):

Puddle Tutorial Part 4

(Same process with the fire)

Puddle Tutorial Part 5

You then want to pre-compose these newly reflecting layers, all into the same composition. We’ll now be looking at something like this in our layer panel:

Puddle Tutorial Part 6

Now for the magic moment! Apply the “Compound Blur” effect to our reflection layer. The compound blur effect is similar to a traditional blur, except it blurs an image with its blur strength dependant on another texture (so brighter areas are blurred more than darker ones). Set our blur layer to our Puddle Map, and turn up the Maximum Blur parameter. You’ll quickly see everything fitting into shape!

Puddle Tutorial Part 7

Puddle Tutorial Part 8

It may take a little bit of experimentation since no project is the same. For example, setting this layer to an Alpha Inverted Matte might fix some issues you may have to your scene. You can even try using different puddle maps from the range in our collection.

You can then mask out any areas you don’t want a blur to appear on, such as these posts which are trying to make our life difficult.

Puddle Tutorial Part 9

Lastly, as we have a fire in our scene, it’s mandatory to add a glow effect (we can go deeper into this in another tutorial!).

Puddle Tutorial Part 10

Hopefully, this clears up any questions regarding these puddle maps! These things are powerful tools for any compositor in VFX or design, and will always give your scene an extra breath of photorealism. We hope you enjoy using them!

Puddle Map and Fire Tutorial in After Effects

Did you enjoy this guide? You might also like to read about our bullet hole collection!


New Bullet Hole Assets!

Download HD bullet hole impact VFX assets here!

Too often do we overlook one of the must-have features of a gunfight in our VFX. Bullet holes!

I’ve seen a lot of fight scenes involving a shootout simply focus on the muzzle flashes, but seemingly jumping over the fact that for every bullet shot, there is some form of damage inflicted on the scene (unless they’re shooting into the air, perhaps at some unlucky ducks). We wanted to change this, by making it more accessible for VFX artists like you to create these effects quickly and easily.

Our collection of bullet hole graphics have been made specifically to fit any compositors needs, in a superbly large resolution. The pre-keyed alpha matte means it is already ready to be blended into whatever surface it is being applied to, whether that is metal, concrete, or even glass!

Our smashed glass collection is essential for any fight scene. These are the easiest to apply, just drop it over your glass, apply a screen blending mode to it, and voila!

We hope these HD bullet hole assets are a perfect addition to your VFX workflow. Download them all today!

Thinking of how you can make your scene even more explosive? Let us introduce you to our rubble collection.

New Rubble and Debris VFX!

Many artists try to avoid the deep end of the pool with their projects. Setting yourself up with an overly demanding goal will always push you to your limits, a goal such as turning your scene into a war-ravaged battleground!

But now, you can dive into the deep end will full confidence! We’re happy to present to you our latest collection of 25 rubble VFX assets to help you build the apocalyptic scenes you’ve always wanted!

Debris and rubble have always boosted the production value of movies. What would Transformers or Infinity War be without their absolutely breathtaking destruction (pretty underwhelming I guess)? With our rubble, paired with our gigantic collection of debris effects (available here on footagecrate), you can impress everyone with your cinema-worthy VFX and editing.

VFX Rubble Asset Preview

All of the included assets have been built with the highest quality possible, with a variety of sizes, camera angles and material options to help you truly have control over the look of your composite. We have also taken the time to pre-key these assets, and even include realistic shadows, meaning they will blend into your scene without any trouble at all!

Download the HD pre-keyed rubble and debris VFX, and start creating today!

If you found this helpful, you may also be interested in learning about our debris burst collection!

Over 30 New Magical Sound FX!

New Magical Sound FX are now available for download!

We have been needing fantasy/magical sound effects for so long, and we are happy to share the new collection with you.

Our content has depended heavily on the SciFi category for supernatural sound design, which work well for some content, but not everything. The new Magic Sound FX  rounds things off nicely. These have a more fantastical element to them.


Fantasy Gliss options are perfect for a memory transition, falling into a dream, or summoning your fairy godmother.

Fairy Dust selection is wonderful for any magical or supernatural particles, whether you’re flying through a nebula or are sprinkling a love potion into someone’s drink.

Whooshes and Spells are helpful when generating magic or powers, and can be used nicely in tandem with our SciFi collection

Want some Magical VFX?

Check out these awesome Fireball options!


6 New Spy Music Tracks!

Need music for a heist, caper, spy scene or any sneaky business? We got you covered.

These 6 new tracks will make your audience wring their hands in anticipation. We’re offering a few tracks with more serious tones, and a few that are more playful. We’ve used these in a few of our shorts already, give them a listen and remember to use them next time your scene calls for some sneaky goodness!

Download them today! 4 of these tracks are exclusive for Pro Members, 2 of them are Free for all users!