Nuclear Bomb VFX Tutorial

A few days ago we covered creating a missile launch VFX shot. But now it’s time to take a look at the receiving end of the attack and build out one stunning looking explosion!

If you’re new around here, welcome! ProductionCrate is your friendly-neighbourhood source for creative assets, ranging from VFX, sound, music and motion graphics. We have thousands of professionally made effects ready for you to download today, and one of them is our much-loved nuclear bomb explosion which you can download here. We have plenty to choose from, many of them are free to download, so pick your favourite and we’ll jump into the tutorial.

From past experience where I’ve tried to composite nuclear bombs and other large explosions into my video, one of the most difficult steps is correctly creating the lighting. Usually, this is done by masking out dozens or even hundreds of different surfaces which will reflect your explosion. This can easily take up hours of your time just perfecting it, especially if you have movement involved.

So I offer my secret solution to the perfect lighting; shoot during sunset!


This will create the lighting you need in no time, casting a fiery glow across the sky. I’ll grab my scene from here, which looks perfect with the skyline being silhouetted by the brightness of the sun. You can use this too unless you have your own!

I’ll be using Adobe After Effects (should have used Nuke!), but the same processes can be applied to any compositing software, even Premiere Pro or Hitfilm.

Create a VFX Nuclear Explosion Tutorial

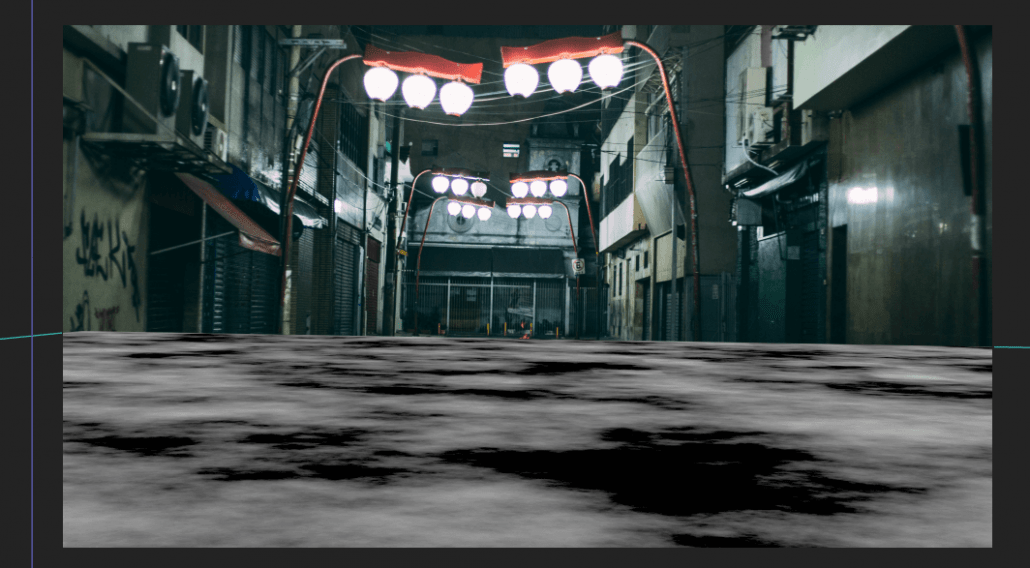
If you downloaded the sample image, you might notice I’ve made a few changes (mostly because I didn’t want that gigantic building in the way of the explosion). Feel free to Photoshop it around a little to best fit your artistic needs. We’ll first need to quickly create a foreground mask, but thankfully we can use a luma-key or the Extract tool to only keep the dark areas of the shot, which are the buildings.

Create a VFX Nuclear Explosion Tutorial

Download our nuclear explosion VFX asset (available for free users too), and drop it into your scene roughly where the sun is.

Create a VFX Nuclear Explosion Tutorial

If you’re thinking that this doesn’t look natural at all, then you’re perfectly right. We need to match our smoke to the colours of the sky and what better way to do it than with our favourite tint effect. Use the colour pickers to select the horizons colours, preferably where the object you are selecting is black in reality, but obscured by the atmospheres glow. This should perfectly blend it to match the ground.

Create a VFX Nuclear Explosion Tutorial

To bring back the flames, duplicate the layer and clear the effects. We then need to use a simple extract/luma key to remove the smoke. Set the layer’s blending mode to Screen, and our blast will already looking great!

Create a VFX Nuclear Explosion Tutorial

And as always, bombard our flames with a bundle of wonderful glow effects!

Create a VFX Nuclear Explosion Tutorial

The next step is optional, but I love the extra intensity it gives the brightness of the explosion. Duplicate the foreground layer of the buildings, and apply a Light Burst effect to it, centring the origin to the explosions centre. It will cast these immense volumetric shadows through the atmosphere and looks fantastic!

Create a VFX Nuclear Explosion Tutorial

It’s up to you know to stylize the scene as much as you would like, but in the end, we should have a magnificently epic explosion!

Create a VFX Nuclear Explosion Tutorial


Missile VFX Tutorial!

While most special effects created practically do look incredible, not every studio has the budget to launch an inter-continental ballistic missile. But fear not! Your perfect shot of the nuclear apocalypse kicking into action can be created harmlessly using our missile VFX assets that you can download for free!

This tutorial will work in pretty much any compositing software, whether that’s Nuke, Premiere Pro, Hitfilm or After Effects (which I will be using).

First we will somewhere to launch our missiles from. I’ve found this stock image which you can download for free here at Pexels. After you have found your perfect spot, go ahead and download some of our missile launch VFX assets, some of which are free! 

Dread it, run from it, rotoscoping still arrives. This unavoidable step won’t be too troublesome since we’re using a static image though. Yay!

Now we have the chance to throw in as many of our missile launches as we want. I’ve gone for the “all hell has broken loose” style, similar to what we saw in X-Men: Apocalypse. I’ve also masked out a few of the smoke-trails where the missile passes through the cloud, increasing the feathering to make it appear more as though the missile is inside the scene.

For some extra-special stylised touches, I also split some of the smoke plumes into two segments. One where the light hits the smoke, and the other where the landscape casts a shadow over it, giving the highlighted areas an orange tint and a screen blending mode. This isn’t necessary in all shots, but works here since we’re in the sunlight.

And it’s as simple as that! Apply your final touches, grade it a little and you have just created an awesome realistic missile launch shot using our ProductionCrate VFX assets!

Missile VFX to Download

There’s plenty more to learn and discover on our website, so why not learn about our less dramatic puddle maps? 


Disintegration Tutorial

Find the disintegration effects here

Adrian and Chris teach you how to recreate this amazing effect in Adobe After Effects!

Create an Epic Space Scene

Using After Effects and Element 3D Adrian and Chris teach you some tricks to creating a cool space-travel scene!


FREE USS Space Crate 3D Model   Use our Free 3d Spaceship model with textures in your own space-scene!

FootageCrate Space Travel Assets   Here you can find our lightspeed and star assets

Chromatic Aberrator Script   The Chromatic Aberrator Script is available to Pro Members and is perfect for any space shot

Video Copilot ORB  We love this Free plugin from VideoCopilot.net – make sure to check it out


Mystique Transformation Effect

Using After Effects and C4DLite Chris and Adrian teach you how to create this iconic effect from X-Men, the Mystique Transformation!

Find the Feather Transition Rendered FX Here

Pro Users can download the  3D Head C4Dlite and Alembic Files (PRO)

Find Eugene’s Tutorial Here

Enjoy the Saturday Morning Tutorials? Check out the The Complete Episode Guide

Predator Effects! (Heat Vision & Cloaking)

Predator effects are awesome. The Predator cloaking and thermal-vision VFX have been used since the original premiered in 1987, and we decided to finally tackle these iconic FX ourselves. Check out our #SaturdayMorningTutorial below to learn how to make these FX yourself in Adobe After Effects!

You can find our HUD Video Assets Here

And the HUD AE Template Here

Enjoyed the tutorial? Check out our #SaturdayMorningTutorials episode guide

Using our Puddle Maps!

If you’re reading this, there’s a chance you’ve stumbled upon our puddle map collection and wondered, “What on Earth are these for?”. You’re not alone!

If you’ve had some experience with 3D design, you may be familiar with “glossy maps” or “reflection maps”. These are textures which can tell rendering software how “shiny” an object is. Think of a white texture being for a mirror (very shiny), and a dark gray texture used for concrete (very dull and matted). We discovered we can use these in After Effects to create utterly-realistic reflections to help composite VFX into your scene, or just make it visually incredible. You may have seen Andrew Kramer’s Video Copilot tutorial which involved a similar process.

We have dropped one of our fire VFX assets (found here) into our street, but anyone can see it is looking pretty dull at the moment! Our mission is to make this look both realistic and more visually interesting!

Puddle Tutorial Part 1

We will then need one of our puddle maps. There are different varieties (such as asphalt, tiles, road surfaces and more), so choose which one best fits your shot. Drop it into your scene, make it 3D, and align it with your ground:

Puddle Tutorial Part 2

Here is where you might see where this is going! Duplicate any of the layers you want to reflect in the puddle. In this case, the fire and the backdrop. We’ll name them the same but with “Reflection” at the end. Pre-compose the puddle map as well.

Puddle Tutorial Part 3

For each of the “Reflection” layers, flip it vertically and position it in a place where it would approximately match what it would look like if the floor was a gigantic mirror. Here’s my attempt (with the walls roughly masked out):

Puddle Tutorial Part 4

(Same process with the fire)

Puddle Tutorial Part 5

You then want to pre-compose these newly reflecting layers, all into the same composition. We’ll now be looking at something like this in our layer panel:

Puddle Tutorial Part 6

Now for the magic moment! Apply the “Compound Blur” effect to our reflection layer. The compound blur effect is similar to a traditional blur, except it blurs an image with its blur strength dependant on another texture (so brighter areas are blurred more than darker ones). Set our blur layer to our Puddle Map, and turn up the Maximum Blur parameter. You’ll quickly see everything fitting into shape!

Puddle Tutorial Part 7

Puddle Tutorial Part 8

It may take a little bit of experimentation since no project is the same. For example, setting this layer to an Alpha Inverted Matte might fix some issues you may have to your scene. You can even try using different puddle maps from the range in our collection.

You can then mask out any areas you don’t want a blur to appear on, such as these posts which are trying to make our life difficult.

Puddle Tutorial Part 9

Lastly, as we have a fire in our scene, it’s mandatory to add a glow effect (we can go deeper into this in another tutorial!).

Puddle Tutorial Part 10

Hopefully, this clears up any questions regarding these puddle maps! These things are powerful tools for any compositor in VFX or design, and will always give your scene an extra breath of photorealism. We hope you enjoy using them!

Puddle Map and Fire Tutorial in After Effects

Did you enjoy this guide? You might also like to read about our bullet hole collection!


Fall through a Wormhole!

Learn the VFX techniques used to create this amazing wormhole scene! Inspired by the visual masterpiece Doctor Strange (2016) We decided to create this journey through space and time.

Download FREE and PRO Wormhole Backgrounds and Green-Screen Footage Here

Find the  Earth Texture Here


Throw a Moon like Thanos in After Effects!

This was one of the most spectacular scenes in Avengers: Infinity War.

On paper, the idea of throwing a moon at someone sounds too over-the-top to attempt outside of an anime show, but somehow the film pulls it off beautifully. We decided we wanted to attempt the same effect! Check it out below.

Learn to throw a moon like Thanos did in Avengers: Infinity War in our latest AE Tutorial!

All download links to the Visual Effects used are below!

Giant Meteor Effect

Thanos Portal Effect

Aerial Explosion Effects

Ground Plough Debris Effects

Large Debris Effects

Venom Effects

Find all the Venom VFX used Here

These effects were created in 3DS Max with Splines