
How to Use the ACES Workflow in After Effects 2023 – Tutorial
What is the ACES workflow?
ACES. It’s a simple term, with plenty of difficult-to-grasp concepts behind it. Nevertheless, let’s take a step forward with an entry-level explanation of what ACES is:
ACES, or Academy Color Encoding System is considered to be the ‘industry standard’ for colour. Think of standardised traffic laws but for colours instead! ACES is often associated with fields such as filmmaking, visual effects, animation and color correction.
Now let’s dive into a more in-depth explanation of ACES and how it is expected to make waves in the future of post-production.
In this article, we’ll jump into detail about all the things that come under ACES, before moving on to how you use the ACES workflow in After Effects. Let’s begin by answering the first question:
What is a Color Space?
In simple words, a color space is a particular subset in the full color spectrum, which is also a standard colour profile for digital media.

The horseshoe graph represents all the colours that are perceived by the human eye. However, the industry standard – ever since the introduction of coloured television – has long been stuck on the sRGB colour space. sRGB is a smaller colour space and does not contain the full range of colors that is perceivable by the human eye.
When talking about the colour space, you may also come across the word, colour gamut. This basically refers to the range of colours that any device can display or produce. Because of this factor, the colour space may vary depending on the device you are viewing it on.
This leads us to the question,
Is ACES better than sRGB?
ACES has a wider colour gamut. Think of a colour gamut as a canvas. The bigger the canvas, the more possibility and freedom there is to extend colours. In this analogy, the canvas of potential colors ACES can contain is much larger.
Older TVs and films were limited in their ability to display a wider range of colours – hence the industry standard sRGB that we know and witness everywhere today.
The problem? sRGB is not the best for post-production, VFX and 3D rendering – especially when audiences now have higher expectations of the quality of colors.

What is the Purpose of ACES in Post-Production?
Every device has a different colour gamut. For example, if you rendered footage on film with a wider film gamut, it will automatically look a lot more dull on a monitor that has a smaller colour gamut.
As you can probably imagine, this causes a lot of problems in post since there are various input sources depending on the kind of camera used – since every camera, such as RED, IMAX etc. have their uniquely patented colour spaces. Because of this, a lot of time – and resources – is spent to ensure that all input sources are in line with each other before any colour correction work can even begin.
This is the exact problem that ACES aims to solve. Now that we know the root problem that ACES aims to solve, let’s go through what ACES is once again.
What is ACES?
ACES is a device-independent image interchange and colour management system that aims to standardise the various colour spaces between different input sources.
ACES is mainly composed of three main features:
- High Dynamic Range (HDR)
- Workflow that is RGB-based
- Ultra-wide colour gamut
These three features are what makes media processed using the ACES workflow suitable for professional use.
The ACES Workflow – Easy Explanation
ACES isn’t a program or a plugin that you can download and use. Instead, it is a workflow that can improve our renders.
It does so by offering the following features:
Expanded Colour Space
ACES offers a wider colour landscape as compared to the standard sRGB; making renders seem more photorealistic than what we may see on TV or on computer screens usually.
Natural-Appearing Highlights
With ACES, it is possible to avoid overexposed areas in an image, especially where any intense sources of light are visible, such as the sun, explosions and muzzle flashes.
Linear Workflow
Linear workflows process light linearly, without gamma-correction interfering with the colour information. This mimics the way that light behaves in the real world, allowing editors to make predictable adjustments to their images.
Wider Colour Representation
Thanks to the expanded colour space, calculations made in ACES make use of more colors that are out of reach from the standard sRGB color space.
But, the question remains,
How Does the ACES Pipeline Work?
Let’s take a look at core elements of the ACES workflow in-depth:
What is IDT?
ACES works in what is called a scene-referred linear space. This is the digital representation of the linear luminance levels as seen in front of a camera lens. Or, to make it even more simple, a scene-referred linear space is the direct, one-to-one relationship between the real-world brightness, and the data that is used to represent that in an image file.
But, then how does ACES work with camera files if it uses a scene-referred linear space? It’s simple, ACES uses what is called an Input Device Transform (IDT) to transform 10-12 bit log values in the camera files to scene-referred linear space.
Because every camera is different, a different ACES IDT is required for various cameras.
What is ODT?
Once images are successfully transformed into ACES space, it is imperative to make sure that they’re being displayed correctly. This is where we come to the second step in the ACES workflow; the Output Display transform (ODT).
An important thing to remember when working with a monitoring device is that there is no such thing as a perfectly unbiased display device (capable of displaying colours with perfect accuracy). It is impossible to display scene-referred linear image information since every monitor display has limitations and can only show a specific colour gamut.
As is with any display device, the display device you use will also expect input data that is encoded with a non-linear color space. Similar to any camera that needs a dedicated IDT, every display device and rendered file outputs through ACES needs to be provided in standard delivery colour spaces, such as sRGB or Rec.709.
Preserving Data By Unification
Another part of the ACES workflow is preserving the intended look of your project once you have color graded it. This is done by using a platform independent method.
This is part of another transform known as Reference Render Transform (RRT). This will ensure that whatever new colour spaces or output devices are released in the future, the grade that you intended will always remain as it is.
You can read more about the fundamentals of ACES here.
What is Tone Mapping?
If we wish to view the results of our ACES render on an sRGB monitor, we would have to map the high dynamic values, to the low dynamic values (in this case, sRGB). This process is called tone mapping and is also performed during the last step.
While the ACES workflow may seem like a lot to handle all at once, it is still a good time to get your hands used to working with ACES. Keeping up with new technology is an integral part of working in the field of visual effects; especially as OLED TV displays become mainstream and people will start to demand content with rich colours.
Ready to expand the colour gamut that you’ve been using?
How to Use the ACES Workflow in After Effects
Previously, the availability of ACES natively in After Effects seemed like almost a dream. Users would have to use a third-party OCIO plug-in to run ACES on the program. But with the newest After Effects update (2023), Adobe announced that with OCIO integration – which is a colour management solution that helps with enforcing a colour management technology – users can use ACES natively in After Effects.
If you’ve been itching to get started with ACES on After Effects, read ahead to find out how you can enable the ACES workflow on the program:
Change Colour Management Settings
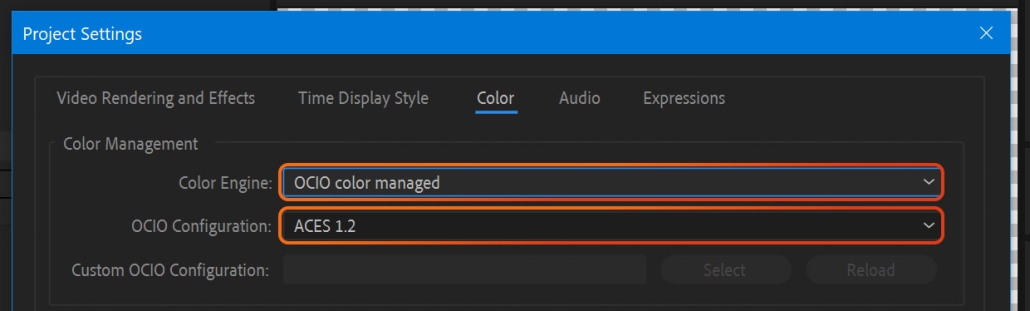
- Select Project Settings from under the Project menu.
- Once you click Project Settings, you should be able to see the Colour tab there.
- Click the colour tab and set the Color Engine as OCIO Color Managed. If you do not see the option, try looking for the Colour Management section first.
- Set your OCIO Configuration to ACES 1.2

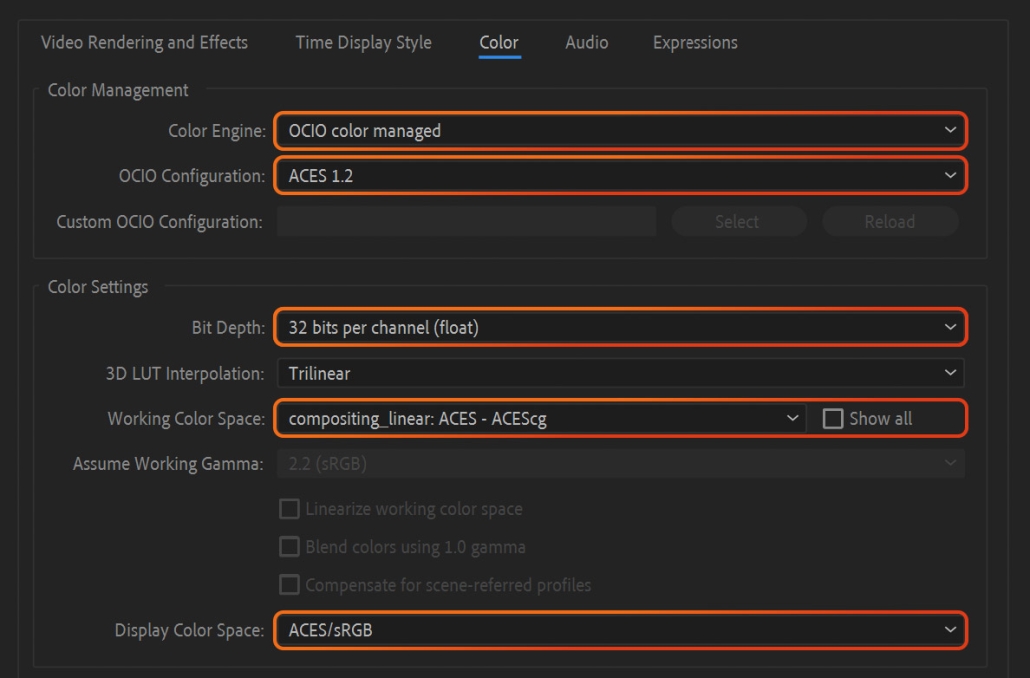
Now we can further refine the color settings.
- Set your bit-depth to 32 bits per channel (float).
- The recommended Working Color Space is “compositing_linear: ACES – ACEScg”
- Next, go to Display Colour Space, and select ACES/sRGB
Choose Media Colour Input
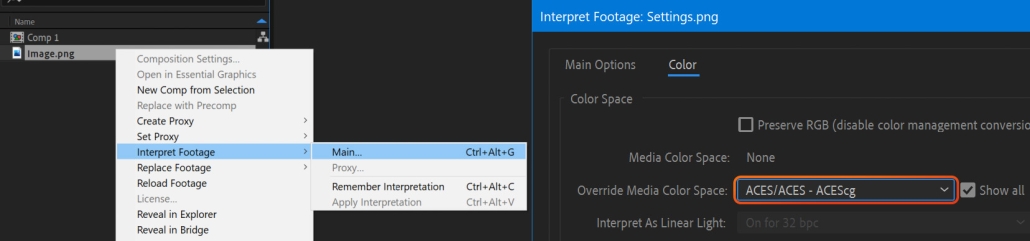
The OCIO Configuration may automatically assign any imported media with an overridden Media Colour Space.
If you want to make changes to the input media’s color space, then you will have to override this setting.
Follow these steps:
Right-click the footage → Interpret Footage → Main → Color → Override Media Colour Space
The colorspace you select here will depend on the file you import. For example, PNG images will often require the Output/Output – sRGB color space, while footage files may use Output/Output Rec.709. It is recommended that you take the time to understand what your source media has been encoded in for the best accuracy.
Update and Specify Colour When Creating a New Composition
If you’ve worked with After Effects for a long time, then you know the Composition Panel is responsible for displaying colours that are converted from the working space to the ones on the display.
To change these colours, all you have to do is choose a colour by:
Composition Panel → Display Colour Space

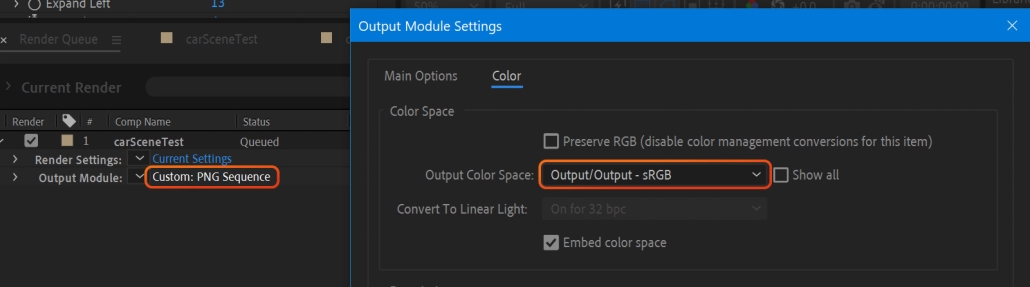
Choose Colour Output from the Render Queue
Once you’re ready, add your project to the render queue, don’t hit render immediately! Instead, go to the Output Module dropdown list and:
Custom → Colour → Output Colour Space → sRGB or Rec.709 (use these when exporting a final deliverable).
And that’s your ACES workflow implemented! It is not as difficult as it may sound, or as difficult as others make it out to be, but it does make a huge difference to the quality of your render.
Why deprive your audience (and yourself) of true-to-life colours and present dull colours within a limited colour space when you can expand and break the boundaries of what’s visually possible?
If you’re worried about where to begin, there are plenty of YouTube tutorials – both new and old – that go into detail about what ACES is, and how you can start creating with the ACES workflow today!

