We have always loved the super-slow motion scenes of Quicksilver in the X-Men films. A lot of creators have attempted to create their own version of the effect, we thought it was past due for us to try the same. Check out our results and the tutorial below!
We used a variety of practical effects, like moving hand-held lights on the subject (2:58) and an office chair to make it appear as though he was actually running on the walls (5:07) but the VFX are where things really came together!
The debris effects were done in Element3D inside of After Effects. We cloned many of these and randomized the rotation to really add in the destructive feel.
We love our action scenes! The pacing of the edit, the looseness of the shooting and of course the music to drive the sequences make them some of the more fun projects to work on. SoundsCrate.com is a great place to find your action music.
Our Action Category on SoundsCrate has been a consistently used section for many of our videos. So much so that we have started to re-use many of the same tracks. It was past due for us to spice things up!
The fantastic composers at Suite Tracks built us (and all of you) 5 new and amazing action tracks. These were made specifically to fit in a variety of films and videos. Our previous action tracks often leaned towards darker tones, while these new ones work well in comedy-action, training sequences and less-threatening but still intense scenes.
War Beat (Free)
Drums pound out excitement and trick your heart rate into trying to keep up in this awesome track. The start hits fast but the build up takes it’s time, ending in a crescendo that will leave you breathless.
No Warriors Here (Pro)
There is a playful, almost goofy vibe generated by this song. It evokes a sense of the 1940’s or 50’s, the war is just beginning and newspaper headlines splash across the screen!
Digital Distress (Pro)
This track maintains it’s synthetic texture while incorporating some classical instruments. It can work well in the Thriller Category about as well as it works in the Action. Whatever is going on in your scene, it’s definitely not good. This can be used well in anything from a modern-superhero movie to an all out Cyborg vs. Vampires flick.
Conquest (Pro)
As the name suggests, this track is great for adventure. Well timed-bells signal the unifying of armies while violins keep pace with galloping hoofbeats of the last remaining scout. This track is all build up, no crescendo, giving you the room to play around as needed.
Endless (Free)
Another track that would fit in well in our Thriller Category , Endless keeps you on the edge of your seat while finding time to slow or speed things up without losing your attention.
Enjoy these tracks! Looking for more? See our other Music Posts Here!
https://i0.wp.com/news.productioncrate.com/wp-content/uploads/2019/01/action_tracks_thumbnail.jpg?fit=1500%2C825&ssl=18251500Chris Kellyhttps://news.productioncrate.com/wp-content/uploads/2018/07/Production-Crate-Logo.pngChris Kelly2019-01-23 15:45:102019-01-26 02:49:46Download 5 Action Music Tracks!
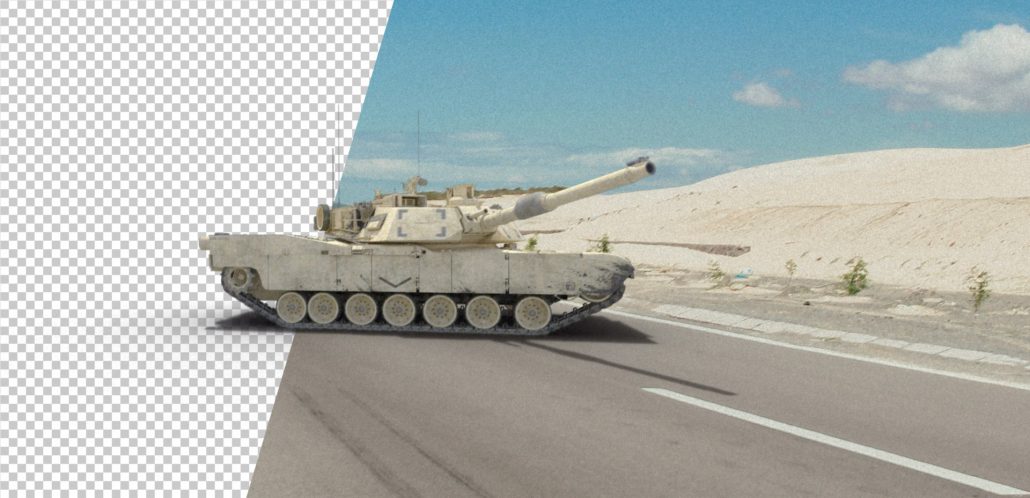
Our hugely requested and highly anticipated tank effects have rolled in!
We love seeing tanks and huge military battles in movies. This is why we’re now giving you control of over 30 unique and exciting elements to bring mayhem to your action film without the huge price tag!
Aiming, rolling, turning and even firing are all included in this huge collection, meaning you can combine these in your timeline to create an entire army of these tanks.
Our effects are all pre-keyed with an alpha channel, meaning you can easily insert these into a shot instantly without any extra hassle.
We’ve also created different lighting variations, so whether your shot is sunny or overcast, our assets will have you covered.
For those who want to go to war with these effects, we’ve created impactful tank firing shots from several different angles.
You can order these different effects so that you can create a realistic narrative, such as having a tank rolling up to the camera, aiming, and then firing… The possibilities are limitless!
We hope you enjoy using these tank effects in your projects. If you’d like to expand your arsenal, check out our action-packed helicopter VFX assets.
https://i0.wp.com/news.productioncrate.com/wp-content/uploads/2019/01/Thumb.jpg?fit=1500%2C825&ssl=18251500David Blakerhttps://news.productioncrate.com/wp-content/uploads/2018/07/Production-Crate-Logo.pngDavid Blaker2019-01-22 06:22:072019-01-22 06:22:07Download Tank VFX Assets
Sky Replacement requires both work and the right ingredients. Keying out the sky is the first step, a nice blue sky will provide you with an easy key, or enough contrast between the sky and the foreground elements will let you pull a luma-matte. Whatever technique you go with, you’ll still need to have the right image for your new sky. That’s where our latest assets to GraphicsCrate come in.
With over 20 new High Resolution Sky Textures, we’ve got you covered. Sunsets, stormy weather, bright blues and those classic white clouds are all available. Never leave your videos with boring skies ever again!
The ultra-high resolution images are available for our Pro Users. Free users can download preview images, with enough resolution for 720p video.
https://i0.wp.com/news.productioncrate.com/wp-content/uploads/2019/01/sky_textures_bg.jpg?fit=1500%2C825&ssl=18251500Chris Kellyhttps://news.productioncrate.com/wp-content/uploads/2018/07/Production-Crate-Logo.pngChris Kelly2019-01-17 12:21:562019-01-17 12:21:56New High Resolution Sky Textures
Whether you’re needing to show off a product in a stylish way, or you just want some beautiful lighting for your renders, ProductionCrate has you covered!
We’ve built out a huge collection of professional studio HDRI maps, all built with quality in mind.
Our environment maps are up to 8K in resolution, meaning you’ll have as much detail as you’ll ever need to render out perfectly crisp shadows and sharp reflections. Our collection features strobes, soft lighting, intense lighting and other various setups for every scenario you may face.
We’ve ensured that our images have a true high dynamic range so that you’ll be able to adjust the exposure in a nearly infinite range of values and still maintain consistent quality.
These are compatible with almost every rendering engine including Vray, Octane and Redshift.
Click and drag the image below to preview one of our HDRI scenes
HDRI imagery is used widely in the CG industry to help create photorealistic 3D renders. While standard 8-bit images can contain 256 different values for each colour channel, 32-bit imagery can contain 16,777,216! This huge leap allows our HDRI imageries data to contain the difference in light intensities between the darkest and brightest part of our studio environment maps.
We’re excited to see what you build with these high-quality studio environment maps!
This extension comes with 50 Animated Hand Gestures, compatible in AE CC
If this is the first extension you have downloaded from ProductionCrate, a warning message may pop up. Your OS just wants to confirm it is standard and safe (it is!)
The installer is built in, so simply double click and follow the installation guide.
The Crate’s Hand Gestures extension is built in with your needs in mind. Toggle through over 50 different animated hand gestures to find the one that is right for you.
We have options for phone screens, thumb swipes, finger taps and so much more!
Customize the skin color and sleeve color of your animated hand, flip the X and/or Y, and choose whether or not to have the motion shapes enabled.
Lastly, simply select the dimensions you want from the 3 most popular and hit Create! Just like that you have saved yourself hours of tedious labor.
If you want to use one of the many Phone Screen options simply create new compositions (File > New Composition) and make sure the settings for the dimensions are 615×1040 to fit perfectly into our animated phone screens.
Depending on how many swipes in your selected animation you will be able to choose 2-3 screens.
Follow the same steps as before and generate! You can toggle the Shy switch for more control, if you want to make any adjustments to the animation. Jump into your phone screen comps and adjust the timing if needed.
This is perfect for all your explainer videos, promos and commercial content. Enjoy!
Want to see our other Scripts and Extensions? Check these out
https://i0.wp.com/news.productioncrate.com/wp-content/uploads/2019/01/hand_gestures_thumbnail.jpg?fit=1500%2C825&ssl=18251500Chris Kellyhttps://news.productioncrate.com/wp-content/uploads/2018/07/Production-Crate-Logo.pngChris Kelly2019-01-09 17:43:252019-01-09 19:58:34Animated Hand Gestures – Extension for After Effects
These are wonderful for sound designing your motion graphics projects or adding some zest to your VFX shots. Don’t limit yourself when you use these assets. We have used them for lava, space-scenes and title sequences!
Looking for more Sound Effects? Check out our Magic SFX Here
There’s something unnatural about the well-known wiggle expression. It’s fair to say that this sort of shake is too perfect.
If you watch over a hand-held video recording, you’ll be quick to notice the immense differences between handheld footage and the go-to wiggle expression.
While the wiggle expression does create a shake, it’s mathematical, where it smoothly interpolates randomly generated keyframes between intervals of time. In the real world, camera shake has a huge range of factors that can influence it: footsteps, wind, and weight of the camera are just a few!
This is why we have created our After Effects script, Crate’s Camera Shake!
The toolkit can create a fully-realistic camera shake with only the click of a button.
It’s fast, fully customisable, and is packed with features. So how does it work?
We’ve tracked and analyzed several different pieces of footage, all recorded in different scenarios. Earthquakes, running, handheld and more are all part of the bundle to choose from. Once you browse the built-in library of shake presets, you can then apply it directly to your footage. It’s that simple!
If you’re seeking more control, we’ve also included a variety of customisable options to perfect your shake.
Amplitude – The strength of the shake.
Frequency – The speed of the shake.
Skip Keys – Reduce the density of keyframes (a value of 2 will place a keyframe every 3 frames instead of 1).
Random Seed – Add more unique randomness to your shake.
Motion Blur – Have the script automatically set up motion blur to the shake.
Auto Scale – The script will calculate the perfect size for your footage so that the shake does not have it drift out of frame.
We’ve also implemented a Jolt for you to choreograph your perfect set of shakes. The Jolt will be applied wherever your timeline scrubber is on your timeline. You can generate a null with the shake or apply directly to your layer.
These can be applied directly into the shake animation wherever you need, and give an impact to your footage. Jolts are perfect for explosions, impactful footsteps, or something rushing past the camera.
Crate’s Camera Shake After Effects Script is exclusive for our Pro Users. The Pro Content continues to grow rapidly, sign up today!
We’ll be using this script in nearly every video we create and know you’ll find it as useful as we do.
https://i0.wp.com/news.productioncrate.com/wp-content/uploads/2018/12/Thumb2.jpg?fit=1500%2C825&ssl=18251500Chris Kellyhttps://news.productioncrate.com/wp-content/uploads/2018/07/Production-Crate-Logo.pngChris Kelly2018-12-31 06:04:252021-02-01 00:18:13How to add realistic camera shake in After Effects – Crate’s Camera Shake
Nathan, dude, 773k subscribers?! Every time I check your channel it’s grown immensely, 1 Million is around the corner! What’s something that’s worked well and something that hasn’t for growing TutVid?
I went through a period of about 6 years where I grew very complacent with the company and what I wanted to do with tutvid and nearly lost everything I had built before that. Not working on my company was the biggest thing that didn’t “work” for growing tutvid.
Maintaining awareness of the industry and always being critical of and willing to change what I am doing has been a massive factor of success thus far. Also, creating content consistently is important.
I think for current-day content creators on a platform like YouTube, you must not only create content consistently, but also be able to create the kind of content that is useful, impactful, is shareable, and is engaging. If you create boring content or useless boring content day after day, you’ll never grow.
I’m self-taught, and so is Adrian. We owe most of our expertise to those who teach online (especially YouTube) so thanks for making such informative tutorials. Why did you decide to teach digital media on TutVid?
I was frustrated when I first started to use Photoshop and Adobe Illustrator that most of the tutorials that were available (back in 2006-07) were either very boring or left out vital details.
I bought a microphone and screen recorder one day and decided to make a crack at recording my own video tutorials (nearly none of them in 2007) and ended up putting them on YouTube and the rest has been history.
We’ve been making tutorials for a while but just recently found a style that works best for us. What’s your workflow like for making a tutorial?
I have a list of ideas and images that I’d like to create tutorials about and I pick something that I like (or sometimes a trend will dictate a video or even the analytics will show that a certain type of videos resonates well with the audience) and begin playing in Photoshop to figure out how I would do it.
I then draft a rough series of notes to reference while recording and sit down and record my screen and audio and work through whatever the subject of the tutorial is.
After that, it’s a matter of post-production, graphics creation, social media, web, and email distribution, uploading to YouTube, Facebook, etc… and trying to share some behind the scenes stuff along the way.
It’s a big process that I’m still working on perfecting.
What’s your day to day work-life like?
Work, email, research, making videos, each working portion of the day is very different depending on what we’re working on so this segment varies greatly day-to-day.
My morning and evening routines are usually pretty much the same, it’s the big chunk in the middle of the day that is always different.
One notable thing is that I only check my email once a day. It’s too much of a distraction and people who need to get a hold of me (clients or family) have my phone number and can call or text if something urgent arises.
Here’s some shameless self-promotion, what’s your favorite ProductionCrate content?
I love so much of what you have to offer in the Motion Graphics portion of ProductionCrate. The transitions would have to be my current favorite. So much good stuff, though.
https://i0.wp.com/news.productioncrate.com/wp-content/uploads/2018/12/thumb.jpg?fit=1920%2C1080&ssl=110801920Chris Kellyhttps://news.productioncrate.com/wp-content/uploads/2018/07/Production-Crate-Logo.pngChris Kelly2018-12-27 13:04:462018-12-27 13:04:46Interview with Nathan Dodson – Tutvid
With only a few days to go until Christmas takes over, it’s time to go over one of the most fundamental uses of VFX compositing – snow!
Whether you’re shooting a Christmas comedy or a reflective and chilling scene for your film, snow can always help add value to your project. But not everyone has access to weather manipulating machines or industrially sized snow cannons, and so in these cases, we must rely on VFX to composite the snow into our footage.
FootageCrate has a huge library of snowfall effects, ranging from realistic to cartoon styled. Similar to all of our content, these snow effects are pre-keyed, meaning that transparency is preserved when you drop the snow footage on top of your shot without any further hassle! You can take a look at our collection of snow effects here.
Let’s get started with the tutorial! You can use almost any software for this, including After Effects, Hitfilm, Nuke and Premiere Pro!
I’ve taken this stock image from Pexels.com, so if you want to follow along, be my guest and download the image.
One step I’ve often seen people skipping is that they don’t add depth to their snow effect. What I mean by this is that it’s quite clearly visible that there’s just a snow effect simply being placed on the footage, giving it a “flat” feel. We’re going to give the snow volume by first creating a solid that matches the colour of the lighter clouds, and making it so that the further away the footage is, the higher the opacity. This can be done through masking or opacity painting.
Already we’ve given a nice volumetric feel to the scene. This will look like snow that is too distant to be seen by the camera individually, and so appears like a cloud.
We can now mask out or rotoscope the foreground so that it doesn’t sit behind this fog.
It’s now time to drop the snow effect into our video. I’ve taken two different effects from the FootageCrate website, which is the “snow background” and the “slow snow falling”. I’ll have the first placed behind the foreground, and the second in front of it. This makes it appear as if the subject is sandwiched between the two snow assets so that they feel part of the scene!
Apply these snow effects with an add/lighten/screen transfer mode so that the dark halos around the snowflakes are invisible, and admire your now far more chilling scene! You can add further colour corrections to then cool the image with bluish tints.
https://i0.wp.com/news.productioncrate.com/wp-content/uploads/2018/12/thumbn-1.jpg?fit=1500%2C825&ssl=18251500David Blakerhttps://news.productioncrate.com/wp-content/uploads/2018/07/Production-Crate-Logo.pngDavid Blaker2018-12-20 06:51:412020-04-09 23:27:25How to add Snow to your videos – VFX Tutorial