Free Camera Projection Script for AE

Projection mapping is a powerful and extremely useful trick for motion design and visual effects. While the concept is relatively simple, the execution can be extremely difficult with native After Effects tools. That is why we built the Crate’s Camera Projection Script. This Free Adobe AE script allows you to easily follow the guided steps to creating your camera mapping and projection mapping scenes.

To download, just sign in to your Free or Pro ProductionCrate account and click here

This technique is useful for tracking a clean plate into your scene and animating 2d stills to appear 3d.

Check out our step by step tutorial here


If you’re looking to use it for 2D to 3D images, check out this tutorial

HUD Generator Extension for After Effects + Premiere

*THIS PLUGIN IS NO LONGER SUPPORTED

We’re happy to release our latest extension, the HUD Generator* from ProductionCrate! Make sure to log in to your Pro Account to download this tool*.

4-13-20201
Our HUD Extension has received an important update! This includes UI improvements, an option to reset where your HUD elements are located, 20 new HUD Assets, and a plethora of bug fixes that will make your experience smoother than ever! If you have already installed this extension, simply run the installer file again to overwrite the previous version (.exe on Windows, .dmg on Mac). To include the new HUD Assets, simply merge the “HUD Graphics” folder with your currently used one.

Check out this video to learn how to quickly and easily install and use the HUD tool in After Effects and Adobe Premiere.


Updates 4-13-2021

Light Sampler – Powerful AE Script

Practical lights have always made visual effects far more believable. We use them all the time. As fantastic as they are, we’ve never been able to use them like this before.

Our latest After Effects Script will let you measure color and luminance values in your shots. Whether it’s the sun, scene lights or effects you can use luminance values to drive reactions in your project. If you have a strobe light going off, you can have automatic muzzle flashes, if you have the sun flashing by a fence, you can add in lens flares that will automatically go off, if you have a practical light that changes color over time, you can drive color to any other effect. All of these shots were built with the Free Light Sampler Script.

Needless to say, this script is packed with potential. We look forward to seeing how you use it. Download it here


Here’s how you use it


How to make Fire Text Animations in After Effects – Typekit Download

Download the fire font typography kit here.

How to create Fire Text in After Effects

Introducing your new favorite font, the Inferno Typekit! This tool is designed to help you create your own intense flaming title animations without any specialist editing knowledge required.

The characters from A-Z are free to download for all users. Pro members of the ProductionCrate community can access the full bundle of numbers, symbols and lowercase letters.

Each character is a separate video file, allowing you to combine them in any arrangement to create the fire text. This allows you to individually manage each letter, giving limitless animation potential.

The most impressive part is that these are all loopable fire video effects. So if your video is a 10-second commercial or an hour-long broadcast, this fire text can be repeated infinitely with perfect seamless transitions. All you need to do is duplicate the fire text and place it directly after the first, transforming them into one consistent animation.

Fire Text Tutorial

For this, we will be using Adobe After Effects. However, the process is incredibly simple and can easily be replicated in your own editing software, whether that’s Hitfilm, Premiere Pro or Sony Vegas. You’ll also need to download our Inferno Typekit here.

One advantage of using Adobe After Effects is that you can download and install our Typekit Script for Pro users. This tool automatically writes the correct text into your composition, however, you can easily drag and position each layer manually. You can run this script by navigating to File -> Scripts -> Run Script File -> TypeCrate.jsx.

Hit the ProductionCrate logo at the top to open your preferences. Here you can press “choose” to navigate to the folder where you have installed your fire Typekit.

You’re now free to type in the text you want to be generated, here I’ll type “Inferno” and press Generate.

How to create Fire Text in After Effects

It’s as easy as that!

From here we can stylise the effect. I’ll be adding some of our new ember VFX assets which are easily composited with a screen blend mode.

Fire Text in After Effects Tutorial

Another effective bundle of assets are the new mini smoke plume video effects which I will once again use a screen blend for. I’ll make a circular mask and feather it so that it appears that the flames are illuminating the smoke.

Fire Text in After Effects Tutorial

Adding plenty of glow effects before applying our final colour corrections to the contrast will complete the look of the shot. I used Crate’s Heat Radiation to create the final grading of the flames, as well as some sharpening to enhance the details in the flames.

ProductionCrate’s mission is to help you create the impossible. Join our growing community today to check out over 10,000+ exclusive VFX, sound effects, music, 3D models and tools.

If you’re interested in our other typekits, check them out here!

Download ProductionCrate’s Free Extension

Organise your assets, instantly.


Say goodbye to messy folders. This free browser extension automatically sorts your ProductionCrate downloads into categorised folders.

Download ProductionCrate Connect

Step 1

Install the free extension in a few clicks.

Download ProductionCrate Connect

Step 2

Download your ProductionCrate assets.

Download ProductionCrate Connect

Step 3

Enjoy automatically organised file management for your assets.


Need any help? Contact us through Support@ProductionCrate.com

Crate’s Heat Radiation After Effects Plugin – Free Download

THIS PLUGIN IS NO LONGER SUPPORTED

Download the free Heat Radiation plugin for After Effects here.


ProductionCrate is releasing a free plugin for Adobe After EffectsHeat Radiation.

We’ve lost count of the number of times that we have added any fire-based effect to our VFX. Maintaining realistic colours is always a challenge for artists, as different fire VFX assets often have different styles that are inconsistent with each other. This is where our After Effects plugin comes in!

This tool is a powerful colouring plugin to help you composite your fire, explosions, lava, stars and anything else that glows hot.

It creates consistent colours which accurately follow the rules of black-body radiation, which defines the properties of light emitted from hot objects.

Download the free Heat Radiation plugin for After Effects

The results created from plus plugin can then overlay the background footage using a screen or add blending mode.

Download the free Heat Radiation plugin for After Effects

Here’s how it works:

  • Create the input layer. The brightness of the pixels will represent the temperature you believe it should be (for example, a fire input will be brighter than its surroundings).
  • In most cases, using a solid-composite effect to avoid the background emitting any light will create desirable results.
  • Apply Crate’s Heat Radiation effect! The default values should instantly provide stylish results.
  • From here you can further adjust the parameters until you’re happy.

Download the free Heat Radiation plugin for After Effects

We wanted to design this plugin accurately represent the real world, and so the temperature-based parameters are in Kelvin. This means that you can input measured values and be given colours that you will expect to see.

Download the free Heat Radiation plugin for After Effects

We’ve extended the limits far enough to reach the surprising phase where the light emitted from a hot object turns blue. This can be useful for plasma, stars, jet-exhausts and more.


Here’s a breakdown of the most useful parameters you will come across in this After Effects plugin:

Max Temperature

This controls the temperature that a white pixel in your input will represent. The minimum temperature will also perform the same, but for the black pixels. You should aim to use temperatures that you expect the scene to have in the real world.

Download the free Heat Radiation plugin for After Effects

Temperature Offset

This shifts the entire minimum and maximum temperature output by a specified value. It can be useful if you want to increase the overall temperature of a scene.

Download the free Heat Radiation plugin for After Effects

Gamma

Creates additional contrast and intensity in the result.

Download the free Heat Radiation plugin for After Effects

Yellow Influence

We recognise that not all black-body emitting objects are perfect, and have included this to allow you to adjust the intensity of the yellow in the output. This is especially useful in flames and explosions.

Download the free Heat Radiation plugin for After Effects

Black Falloff

The value of the black falloff will define the temperature of a pixel that is at 100% brightness. Anything between this and the Black Point will be linearly interpolated towards 0% brightness.

Download the free Heat Radiation plugin for After Effects


A useful tip for using this plugin is to apply a curves adjustment before the Heat Radiation effect. This will allow you to precisely control the intensity and contrast of the inputs for quick manipulation of the final output.

Windows Installation

To install the plugin, simply navigate to your Adobe After Effects folder (C:\Program Files\Adobe\Adobe After Effects CC 2019\Support Files\Plug-ins) and insert “HeatRadiation.aex”.

Mac Installation


To install the plugin to a Mac device, locate your Adobe After Effects folder (/Library/Application Support/Adobe/Common/Plug-ins/7.0/MediaCore/ProductionCrate) and insert “HeatRadiation.bundle”.


Download the free Heat Radiation plugin for After Effects

We hope you enjoy creating even more spectacular projects with this free After Effects plugin. If you’re interested in more content, check out all of our scripts and plugins for Adobe After Effects here.

Crate’s Shape Script – Our Most Feature Packed Tool

Sign in and Download the Crate’s Shape Script Here

Place the script into your Adobe > After Effects> Scripts Folder, and the Images into Adobe > After Effects > Scripts > Images, if you already have an images folder just drag the images from Crate’s Shape Script .ZIP into that folder. Please report any bugs you may find in the comments below, we will continue to update this script.

We love After Effects. What other software offers you so much creative flexibility? Whatever your project calls for, from Visual Effects to Motion Graphics, this software gets the job done.

That being said, we do have some gripes.

Why is it so difficult to create some of the most basic shapes? Why are all the shape controls hidden, requiring toggle-down menu after toggle-down menu?

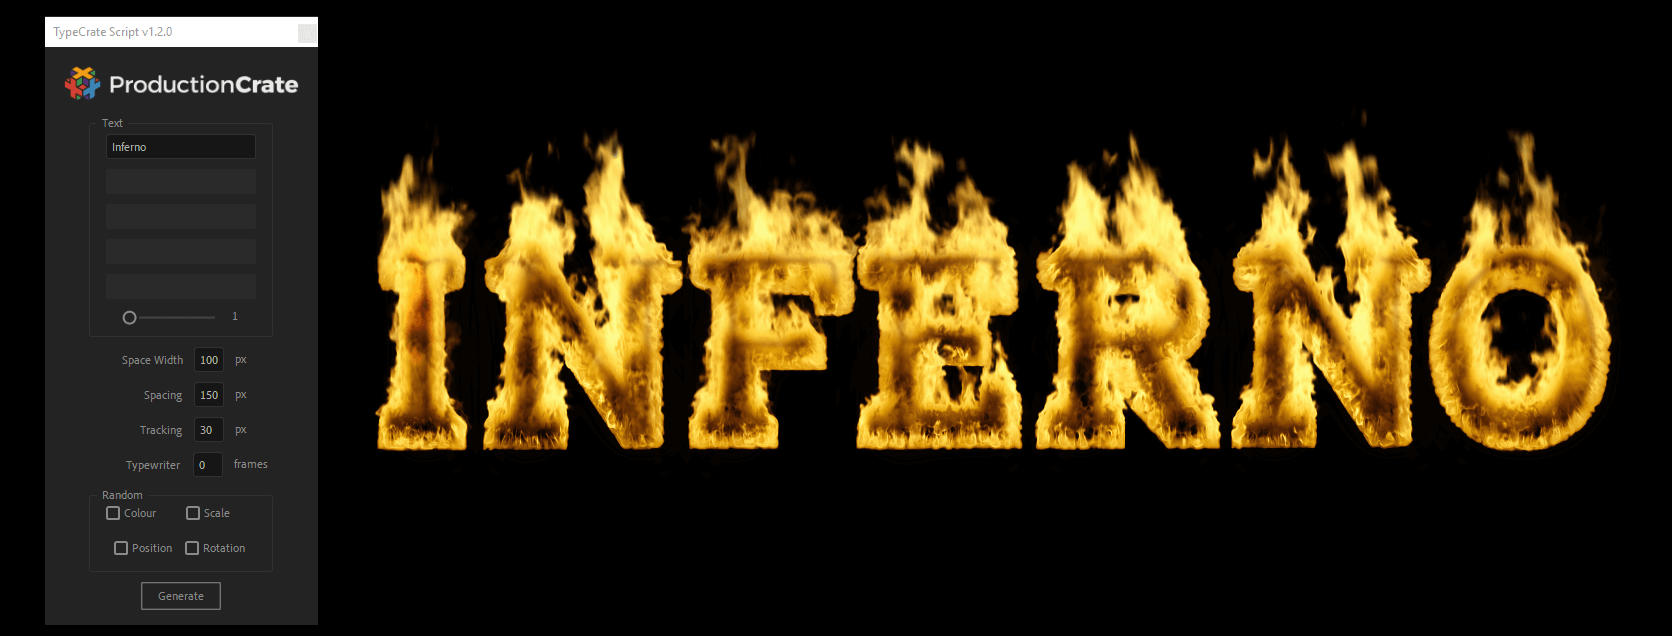
You’ve probably run into these annoyances yourself at one point or another. We definitely have, and we were fed up. That’s why we created Crate’s Shape Script. This feature-packed script addresses our most common issues and solves them with just a few clicks.

There are a lot of features to unpack here. Your first option is a Shape Layer or  Solid Layer. Solid Layers have the shaped masked out of them while the shape layer is made specifically to be that shape. We suggest Shape Layers, but each has their Pros and Cons. Shape Layers also allow you to generate Strokes instead of Fill shapes.

Next you can pick your shape, use the left and right arrows to scroll through all your shapes or simple click the question mark to see them all on the drop-down.

Next, pick whatever color you want. Personally I just leave this as-is, since I can change it later with the eyedropper tool. I also leave the size at 500 and adjust it later, but that is just my preference.

The anchor point will automatically set to be centered (yay!) but if you want to move it to any other axis you can do so after you have generated the shape.

We have built Control Nulls so you don’t have to toggle down menu after menu to change basic features of your shapes. This is helpful in the obvious ways but if you want to adjust basic features the old-school way you can uncheck the Control Nulls box to generate shapes that have no built in parent features. Alternatively you can Alt-click whatever parameter you would like to adjust without using the Control Null.

The randomization powers can be utilized to take one asset and create unlimited variations. Duplicate whatever layer you have for as many duplicates as you want, you can then randomize the start time, the end time, the opacity, the color (or tint), scale, and rotation! This is fun to mess around with, which I encourage you to do. If you want the specifics I’ll list them below.

Last of all choose the number of layers for whatever shape you have chosen and hit Generate.

Enjoy!

How the property randomisation works

Default Random (Random slider checkbox unchecked)
Pos– randomize based on the comp width (comp wide distribution) [x, .75x]
Rot– randomize between 0-360
Opa– randomize between 0-100
Scale– randomize between 0-500 [x, x, x]
timeIn– randomize between 0-comp length (in seconds)
timeOut– randomize between 0-comp length (in seconds)
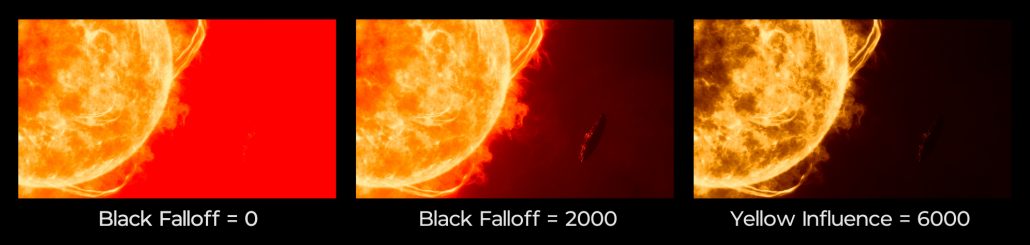
Tint– randomize r, g, and b values of a tint effect between 0-255 (applies to “Map Black To” property)
3D– randomize Z Position between 0-15000

Slider Random (Random slider checkbox checked)

Pos– randomize between 1-slider value
Rot– randomize between 1-slider value
Opa– randomize between 1-slider value (0-100 limit)
Scale– randomize between 1-slider value
timeIn– randomize between 1-slider value (seconds)
timeOut– randomize between 1-slider value (seconds)
Tint– randomize r, g, and b values of tin effect between 0-slider value (0-255 limit)
3D– randomize Z Position between 0-slider value

How the keyframe section works:

Fade Keys (two sets of key frames at the beginning and end)
Creates two group of key frames, one starting at the beginning of the selected layer, the other finishing at the end point of the layer. In and Out are optional, so you can apply the keyframes to just the beginning, just the end, or both. You can set how far apart the two possible sets of keyframes are, by changing the textbox labeled “frames” next to it. (ie, if you select In and 30 frames, it will apply a keyframe at t:0, then t:0+30frames)

Continuous Keys (a keyframe at the beginning and end)
Creates a keyframe at the inPoint and outPoint of any selected property

Download Free After Effects Glow Script – Crate’s Glow

Download ProductionCrate’s Updated EASY GLOW Plugin for After Effects & Premiere Pro

(NO LONGER SUPPORTED) Download the Free After Effects Glow Script here

Believe it or not, there’s a lot that goes into a good glow effect! I’m overly passionate about this particular topic, and would happily spend hours fine-tuning each little pixel of my glow to make sure it makes my VFX absolutely perfect – and ProductionCrate wants to help you do the same.

Except it won’t take you hours… Instead, just a few seconds!

We have built out a powerful glow extension for After Effects, capable of producing the most stunning optical effects for your compositing projects with a single click. We’ve tested this tool to its limits, and are insanely proud of what this can do for VFX artists like you. Additionally, we’ve made this free to download for everyone!

Download Free After Effects Glow Script - Crate's Glow

So why did we make something that After Effects can already do? Those who have already used After Effects built-in glow effect already know the answer – it’s pretty ugly.

That leads us to our next question; what makes Crate’s Glow any better? Our script has been carefully designed to follow the natural physical properties of light, allowing the final result to imitate the realistic gradient-based falloff that we see in the real world. This eliminates the artificial look that After Effect’s built-in glow generates and instead gives us an incredibly aesthetic result.

Download Free After Effects Glow Script - Crate's Glow

Each parameter has been fine-tuned to create the best result with one click. You can easily make further adjustments with user-friendly parameters. These can be changed even after the glow has been created by using the sliders in the “Glow Controls” null layer.


Threshold                              – Minimum brightness for an area of the image to begin to glow

Intensity                                 – Brightness of the glow

Spread                                   – How far out the glow reaches

Flicker Intensity                    – Increase this to have the intensity shift over time

Flickers Per Second             – How often the flicker fluctuates in a second

Tint Strength                         –  When increased, the glow will match the chosen color more

Tint Colour                            – The color used for the tint

Vibrance                                – If you’re losing color in your glow, you can use this to boost the saturation


Usually, the glow effect will work without any extra squabble, but I’ll quickly go through how you can take full advantage of the features available.

Here’s an example of an explosion VFX shot that needs an exciting glow effect to give the fire some further intensity.

Download Free After Effects Glow Script - Crate's Glow

Since we’re organised (most of the time), we have the robot-explosion VFX layer separated from the background. Using keying tools, we can isolate the orange flames in a new layer.

Download Free After Effects Glow Script - Crate's Glow

Selecting this layer, and clicking “Generate” on our glow script will have the glow effect only applied to these flames, adding an extraordinarily epic glow to our fire VFX.

Download Free After Effects Glow Script - Explosion Effect

And it’s as simple as that!

Download Free After Effects Glow Script - Explosion Effect

To download and install the script, open up After Effects and navigate through File -> Scripts -> Run Script File. Find a folder you wish to keep the script stored, and extract “Crate’s Glow.jsx” to the new location. Double click the .jsx file and the script window will open.

If you’re looking for even more scripts to add to your workflow, check out our incredible Hologram extension!

Free After Effects Glow Script - Crate's Glow

FREE Batch Replace Script – After Effects

If you’ve been using After Effects for a while you’ll understand the usefulness of this script. Batch Replace comes packed with features, allowing you to quickly swap layers and assets within your project. Whether you’re looking to create countless variations or adapt upon an existing project file this script is ideal for you. Download it for free here

Check out Nate’s demo covering the basics of using this script.


Want more Free Scripts? Check out this script for Looping content in AE: Free Loop Script for After Effects

How to Install Scripts to After Effects (Windows and Mac)

After Effects scripts are a powerful way to automate and accomplish tasks that would have otherwise taken far longer.

For example, many popular scripts automate the way that you animate, automatically adjusting keyframes in an instant to save you valuable time and get better results.

If you haven’t tried any out yet, you can browse our library of exclusive scripts and plugins. Many of them are free to download, while Pro members of the ProductionCrate community can access the entire collection, as well as over 10,000 other creative assets.

Thankfully, installing these scripts is an incredibly easy process, and works the same on both Windows and Mac. We also ensure that our tools are compatible with the most recent versions of After Effects (CC 2018, CC 2019).

Our example today will be walking through the installation of our free Hologram generator script which has just launched!


1 – Extract the script to “/Adobe After Effects CC 2019/Support Files/Scripts”

If you don’t have any .zip file tools, you can use WinRaR.

Using this software to open the .zip file that you download will allow you to then drag the files to a new location. Make sure that you extract all of the content from the zip file.

Our destination is usually found in the Program Files folder. In most cases the full directory is:

C:\Program Files\Adobe\Adobe After Effects CC 2019\Support Files\Scripts

But if you are using any other Adobe CC version, feel free to place it there instead.

How to Run Scripts in After Effects

2 – Create your After Effects composition

Most of our tools won’t work if there’s no footage for it to work on!

3 – Click File -> Scripts -> Run Script File

From here you can then navigate to the place you extracted the files to. Clicking on the “.jsx” file will then launch your chosen script.


Fixing Errors

There’ll always be the chance that something goes wrong. We’ve compiled a list of steps you can take to troubleshoot these issues

Double-Check

Take a moment to quickly look back in the zip folder, and check if all of the contents are also in the After Effects script folder. If it isn’t, simply drag it all over again!

Settings

Go through Edit -> Preferences -> General. A window will open with a bunch of checkboxes, where you can enable “Allow Scripts to Write Files and Access Network”.

Call for backup

If all else fails, you can ask on the forums, the comments below or contact us at Support@ProductionCrate.com, we’ll happily try our best to help out!