Free Aspect-Ratio Plugin (Premiere & After Effects)

Crate’s Letterbox Plugin included as part of ProductionCrate’s LAFORGE PLUGIN SUITE for After Effects & Premiere Pro

Finally, one-click aspect-ratio bars for Adobe Premiere and Adobe After Effects. Download Windows Version Here* or Download Mac Version Here*

*No Longer Supported

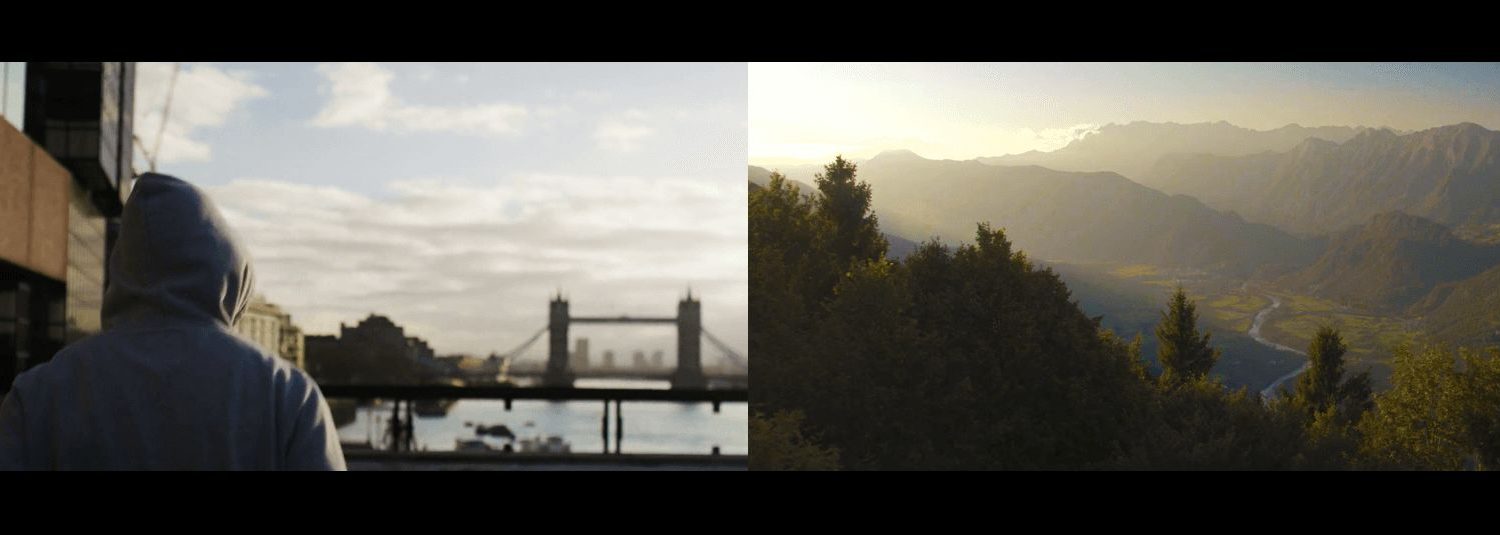
AutoCinemabar is the free alternative to using aspect ratio templates to give your video the cinematic edge you need!

Stumbling through hundreds of different pre-made templates has always been the least exciting part of an editors workflow. So we’ve decided to give everyone an early birthday gift, our free plugin!

The plugin gives you the power to create the essential aspect ratios that your video needs. It takes your videos width and height into account, meaning that the aspect ratios you create will be mathematically perfect for any resolution, whether that is 1080p, 2K, 4K, 8K, 16K and beyond!

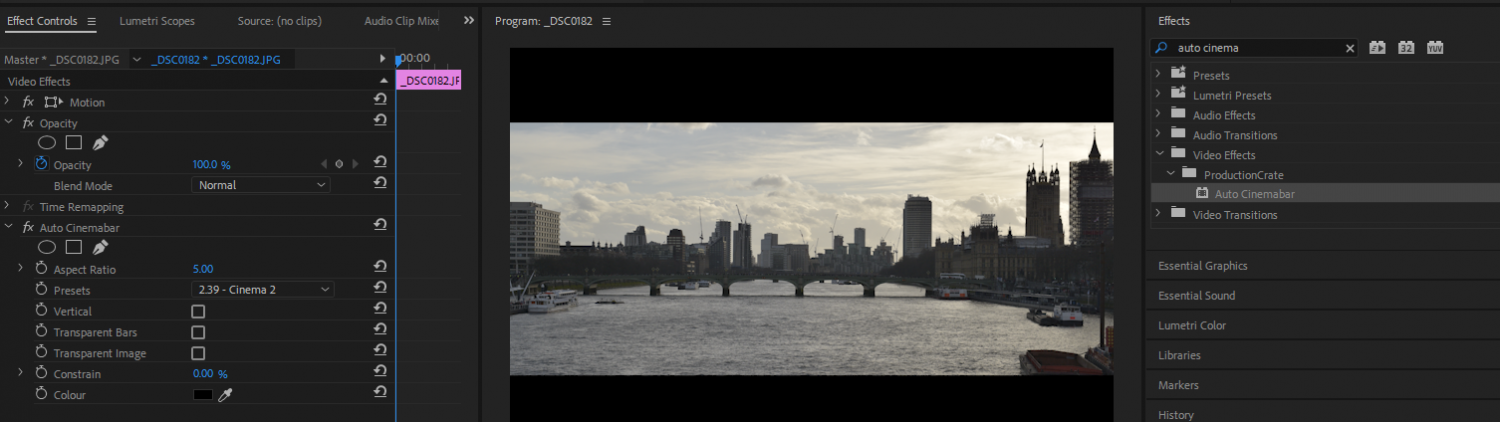
We have considered the most popular aspect ratios used in the industry and added them onto a quickly accessible preset list! This includes 2.35:1, 2.39:1, 1.9:1, 1.85:1 and more! We have even set the default value to the cinema standard of 2.35:1, meaning you will have your aspect ratio built out in an instant! Leaving you with more time to build out your projects creative side.

If you’re hungry for extra features, this plugin gives you the power to:

  • Set custom aspect ratios ranging from 1-3000!
  • Adapt to any resolution
  • Choose from preset templates including such as 2.35:1
  • Grow or shrink the letterbox with the “constrain” tool
  • Set colors for your aspect ratio
  • Use a horizontal or vertical orientation
  • Toggle transparency in different areas
  • Speed up your workflow, and master the art of making your video look cinematic – fast!

Using the plugin is the easiest part of the process. Simply select your video, go to the “ProductionCrate” category in your effects list, and choose “Auto Cinemabar”. Your video will have an aspect ratio within the blink of an eye! If you have multiple clips that you need to apply the aspect-ratio to, then you can apply our plugin to a black solid layered above the entire composition, and check the “transparent image” button. This will make the black layer transparent in the centre, allowing you to see your wonderful video beneath!

Free Aspect Ratio Video Template

Puppet Pin Null Generator – Script

Use this Free Script to generate Nulls where your puppet pin points are.

This script will give you the control of your puppet pin points you have been missing out on. Just install it in your After Effects – Scripts folder and launch!

Download the Puppet Pin Null Generator Script Here

See all our Scripts & Plugins Here!

Just select the layer with your puppet pin points, launch the script, and hit Generate Parent Nulls.

The Label via Mesh or Layer will take the color from your selection.

MotionCrate Script – Realistic Motion Reaction!

Download the MotionCrate Script and give your stock VFX assets some life. This is the BEST script for creating realistic fire in After Effects.

Unarchive the .ZIP and install the MotionCrate Script into your After Effects>Scripts folder.

Launch the script in AE by going to File>Scripts and selecting MotionCrate

Here’s what you will see –

The script works best with Fire and Smoke VFX. It was based off of a tutorial by Wren Weichman

If your Fire, Smoke or other VFX Element is pre-keyed, you will need a solid matte for the script to function smoothly. Create a new solid and drop it beneath your VFX element.

Precompose your Solid and your VFX Element together.

Because this script uses the puppet tool, we recommend drawing a mask around your solid, making sure the VFX Element stays within the bounds of your mask

Navigate back to your main composition so you are no longer in your precomp. Select the ‘Setup Endpoints’ button.

This will create a null with 2 points, Top and Bottom. Move those points to their respective top and bottom of the solid you have masked out.

Enter the number of Nulls you would like to create. 3 is the minimum recommended. The smoother you want your reaction curve, the higher the number of Nulls. We do not recommend more than 7 for any purpose.

Hit the Create Nulls button.

Ignore the Wide Elements button. If you have a wide-based VFX Element, watch the video above to learn how to use the MotionCrate Script with it.

Then enter the amount of Wind, Wind Turbulence, and Delay you would like. You can always adjust these settings later when the Control Null is generated.

Select your precomp with the VFX Element and solid. Find your Puppet Pin tool. You need to put one pin for every Null you generated. Place the Pins approximately at the top left of each null.

Note: Ignore the Endpoint Selector Null, which is usually in the center and Red, when placing your pin points.

After placing your Puppet Pin points near the top left of each null, hit the Generate button.

You may see the image shift as the puppet pin points jump to the null points, but if you were close with your puppet pin point placement, the shift should be minimal.

There will be a Source null created. If you don’t see the null names, select ‘Layer Name’ above your layer window. The Source Null controls all the movement. If you are tracking to an object or person, you will want to parent your source null to that position.

The Control Null allows you to fine tune your Wind, Wind Turbulence, and Delay settings. If you push any of these settings too far, the effect tends to degrade.

And that is how you use the MotionCrate Script!


TypeCrate – After Effects Script

ProductionCrate’s TypeKit AE Script is out!

Our goal is always to provide quality assets and simplify complex processes in video and filmmaking. The TypeCrate script accomplishes both. This script is only available to Pro Users. You will need to download bundled type kits and extract the .RAR archive for the script to function.

Download the TypeCrate script from ProductionCrate!

Pro users can download the script Here.

See all our Video Typekits Here!

To get started with the script in just a few seconds:

  1. Drop the folder containing all of the individual characters in a TypeKit anywhere on your computer.
  2. Launch the TypeCrate script by navigating through File -> Scripts -> Run Script File -> TypeCrate.jsx
  3. You’ve launched the script! Hit the ProductionCrate logo at the top of the UI to open up the preferences. Here we can click “Choose” to navigate to the TypeKit folder containing the characters.
  4. Hit “Done” to save the preferences. We can now enter our text into the text boxes and adjust any setting you need to (The tutorial below goes through each property in detail!).
  5. Once you’re ready, we can generate our TypeCrate text!

Here is everything you need to know about using the TypeCrate AE Script

Enjoy!